Sandi woods | designs

Abbreviations
#
1/2 st
Cls
alt
bp
cont
DIAG
DTRB
foll
L
LS
lt edge pr
MT
NCC EDGE ST
no/NOS
Nr
opt
patt
poss
pr/prs
p.pr/prs
R
rt edge pr
Start pin
Half-stitch
Cloth stitch
alternate
Blind Pin
continue
diagram
Double Tenstick Rolled
Band
following
Left
Locking stitch
left edge pr
Magic Thread
No (Colour) Change edge st
( X T T X T T )
number/numbers
Next row
optional
pattern
possible
pair/pairs
passive pair/pairs
Right
right edge pair
REP/s
REM
s.p.pr/prs
s.ps
td
tech
temp
tog
thro
TC
T O & T B
T.P.
T.S.
TSC
tw
TW CTH
var
WEP
X T
X T X
X T X T
X T X T X
repeat/s
remain/remaining
single passive pair/pairs
single passives
technical diagram
technique
temporary
together
through
Twisted Cord
Tie Off and Throw Back
Temporary Pin
Turning St ( X T X T X )
Turn Section Completely
Twist
Twisted Couching Thread
variation
Wrapped Edge Pair
cross twist (1/2 st)
cross twist cross (Cls)
cross twist cross twist (Cls & tw)
cross twist cross twist cross
(Tenstick smooth edge st,
Locking st or T.S.)

FAQ
Q:
Should the special No (Colour) Change Edge Stitch be used throughout a piece of work, even if the leader pair and the edge pair are the same?
A:
Unless specified otherwise, it is recommended that the No (Colour) Change Edge Stitch is used throughout, so the stresses and tensions remain the same. However there are times when other edge stitches will be used for particular reasons.
Q:
How should the silk threads be tied off before throwing back?
A:
Most usually the best and safest way to Tie Off and Throw Back the pairs is to tie a reef knot and a half; left over right, right over left, left over right or vice versa, passing the tying thread under the other thread once.
Should there be a case when threads are not gripping e.g. when tying off pairs over a bunch of threads or even when tying over just one other pair, then using a surgeon’s knot; first passing the tying thread twice under the other thread, followed by a reef knot, appears to work best.
TECHNICAL INFORMATION
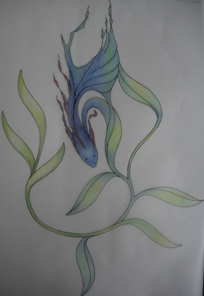
Colour studies and preparatory work
The case for making a colour study cannot be overstated.
The colour study really only needs to be a simply matter of ‘colouring in’ with coloured pencils and the brain in gear. It just requires the outline of the design.
Tracing paper is useful as it enables different layers of information to be placed together, so that not all the information needs to be contained on the same sheet. The objective is to make as many tonal and colour decisions on paper, before actually starting to work the lace, to save time and thread wastage.
Essentially it is about planning where the light, medium and dark areas will be and which colours will be used. For example, will the green (body colour) need to be changed to a lighter or darker tone and will it need to be perhaps bluer or yellower? Keep looking at the design as a whole and ask if the colour balances will work, do they relate to the subject and other elements of the design. Most importantly, will it be possible to obtain the thread colours in a suitable thread count for the scale of the piece?
Bear in mind that the colour study is for information only. It does not need to be a work of art and it is more visually informative than simply writing descriptive words, e.g. blue/ green or yellow/green on a copy of the design which would raise more questions than it would solve. When working the piece, if ‘blue/green/yellow’ has been written down it will not explain what type of blue/green/yellow will need to be chosen.
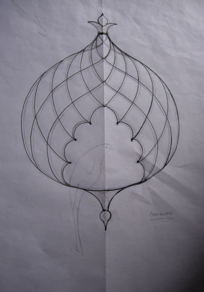
When making ‘sectional’ lace, as sections are worked, they appear to be scattered around the design. If top sewings are used to join sections, then subsequent sections appear to sit behind the first section worked. Consequently, the order of work needs to be thought through in advance.
Useful preparatory work includes making notes on a design outline showing which and where textural patterns e.g. Milanese braids are to be placed and indicating edges that will be rolled.

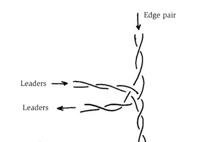
Thread positioning
When working from the pattern instructions, in order to define precisely the positions of the relevant threads, pay attention to the way in which the thread positions are numbered.
Note: The leader pair and edge pairs are not included in the counting when establishing the positions of passive pairs.

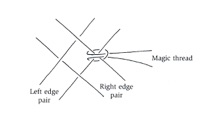
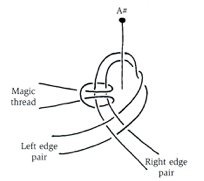
Magic threads
Using ‘magic thread’ enables a future sewing to be made easily in difficult situations, usually in a situation where the pinhole is likely to close immediately the pin is removed.

No (colour) change edge stitch
This special edge stitch was developed in order to allow the leader pair and edge pairs to remain in their selected positions. Its use enables the existing colours of the leader and edges pairs to be maintained i.e. they are not exchanged at the edges of the work.
This edge stitch is essential to the concept of working with coloured threads in a painterly way and is worked thus;
X T T X T T.
Note: This edge stitch is worked throughout all pattern, unless specified otherwise.

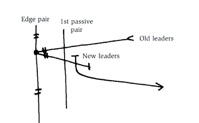
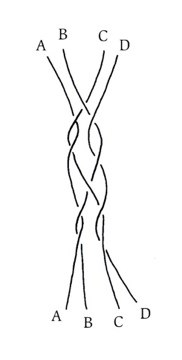
CHANGING LEADERS
One of the ways to change the colour of the leader pair is to simply replace the pair with another.
This is worked after the pin has been placed and the edge stitch completed:
Cls leaders thro 1st p.pr,
add new leaders on TP to hang between old leaders and 2nd p.pr, Cls old leaders thro new leaders,
T O & T B old leaders, cont with new leaders.

CHANGING LEADERS with the EDGE PAIR
The colour of the leaders may be changed by exchanging them with an appropriate edge pr: X T X T T

WITHOF ROLLED EDGES
A Withof rolled edge is useful to give an extra dimension to the work, and is also a convenient way to ‘lose‘ cut ends when finishing at a point.
Extra threads of the same or different colours may be added singly, on a pin above the work, to increase the thickness of the roll, or removed by simply throwing back out of the work, to be cut off after the roll is completed.
A Withof roll may be worked any number of threads/pairs, or with with just pair. The roll requires one thread to be the ‘rolling thread’ and at least one thread to form the ‘roll’.
To work a Withof Rolled edge:
Start: After tying off the threads at the finish pin of the section, select one thread to be the ‘rolling thread’ which will enclose the ‘rolled threads’.
Using a fine crochet hook (0.35mm or 0.4mm) slide the hook across the fabric of the lace, at a 90 degree angle to the outer edge, inserting it into the pinhole, having first removed the pin. Continue to slide it far enough to lay the thread/s to be included in the rolled edge across the crochet hook. Catch the rolling thread with the hook and draw it back through the pinhole, the rolling thread will then enclose the threads within the roll. Continue to withdraw the loop until long enough to place the rolling thread’s bobbin through its own loop. Tension the loop by pulling the thread through, working it side to side, until it holds the enclosed threads evenly, stroking the bobbins held within the roll gently downwards.
Finish: When the last pinhole has been worked, turn the pillow so that the next and final rolling stitch may be worked into the lower ‘twisted threads bar’ that forms the side bar of the last pinhole.
(The remaining ‘rolled thread/s’ will then be laying across the worked braid section.) After working the final rolling stitch into the lower twisted threads bar, tie off the rolling thread, a series of hitches may then be made with the two threads (and any remaining rolled threads) to hold their ends across the back of the work.
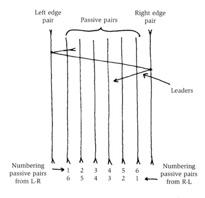
Numbering passive pairs
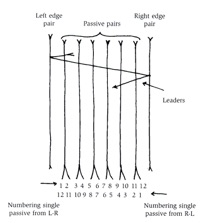
Numbering single passives
Inserting a magic thread for a
two colour start
Inserting a magic thread for a
one colour start
No (Colour) Change Edge Stitch
Changing leaders
Changing leaders with the edge pair